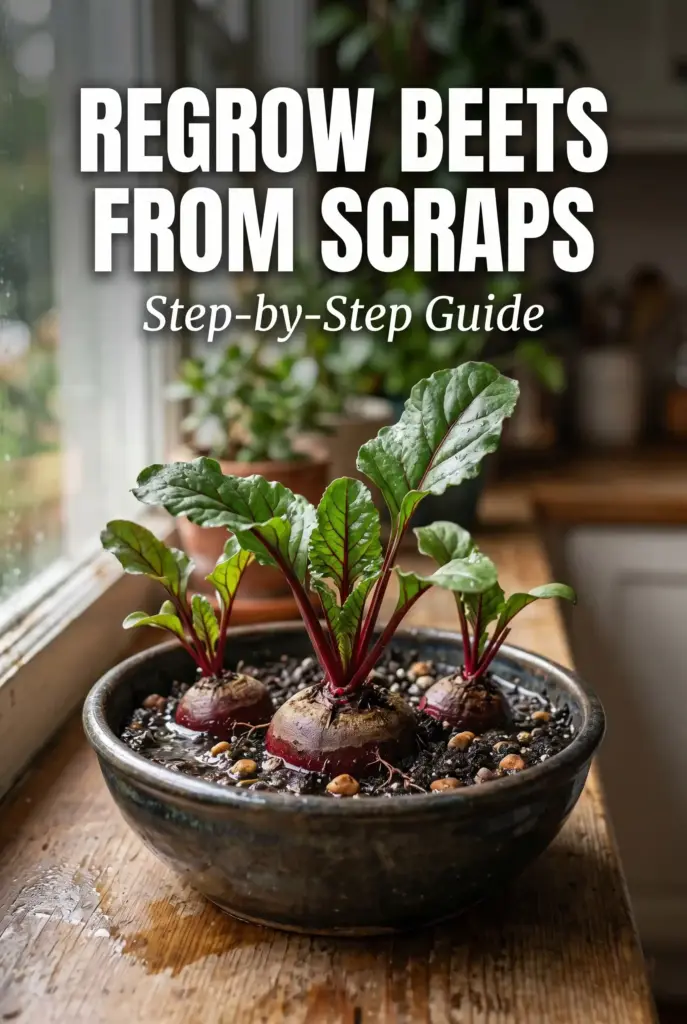
Did you know you can regrow beets from kitchen scraps? It is one of the easiest ways to start a small garden, even if you only have a windowsill. While you cannot grow a brand new beet root from scraps, you can grow a steady supply of fresh, tender beet greens. These leafy tops are full of flavor, nutrients, and color, and they make a delicious addition to salads, soups, and stir fries. Best of all, the process costs nothing and takes very little space.
This step by step guide walks you through exactly how to plant beets from scraps and enjoy a continuous harvest of fresh beet greens at home.
What You Can Regrow from Scraps
It is important to set realistic expectations. Beet scraps will not regrow into a full beet root, but they will grow:
- Lush green tops that you can keep harvesting.
- Edible stems that taste similar to Swiss chard.
- A beautiful, decorative plant for any sunny windowsill.
- Fresh leaves you can pick repeatedly for weeks.
Think of it as an indoor leafy green garden powered by kitchen scraps.
What You Will Need
This is one of the simplest gardening projects you can try. Just gather a few easy supplies:
- A fresh beet with the top still attached.
- A sharp knife.
- A shallow dish or bowl.
- Water and a sunny windowsill.
- A small pot with soil for the next stage.
That is it. No special tools or expensive equipment are needed.
Step 1: Prepare the Beet Top
Cut about an inch off the top of a fresh beet, keeping the small stem area attached. The cut piece should still have the rough top where the leaves emerge. Even if the leaves are gone, new ones will grow back from this section as long as the top is healthy and firm.
Step 2: Place It in Water
Set the beet top, cut side down, into a shallow dish of water. The water should reach about halfway up the side of the beet piece. Place it in a sunny window and change the water every 1 to 2 days to keep it fresh.
- A bright window with several hours of sunlight is ideal.
- Avoid cold drafts and very hot spots.
- Keep the dish clean to prevent slimy buildup.
- Use room temperature water for best results.
Within a few days, you should see fresh green shoots starting to emerge from the top.
Step 3: Watch the Greens Grow
In about a week, your beet scrap will produce small leaves. They grow surprisingly fast, and within 2 weeks, the leaves can be a few inches tall. Keep changing the water every couple of days to keep your scrap healthy. As the plant grows, the leaves get bigger and more flavorful.
Step 4: Move It to Soil
Once your beet top has strong leafy growth and small roots forming, you can move it to soil for longer harvests. Follow these simple steps:
- Choose a small pot at least 6 inches deep with drainage holes.
- Use a quality potting mix with added compost.
- Plant the beet top so the leaves are above the soil and the cut bottom is buried.
- Water gently to settle the soil.
Soil planting gives the scrap nutrients and lets it produce greens for much longer.
Caring for Your Beet Greens
Beet greens are easy to care for and grow quickly with the right conditions. Keep these in mind:
- Place the pot in a sunny window with at least 4 to 6 hours of light per day.
- Water when the top of the soil feels dry.
- Feed lightly with diluted liquid fertilizer every 3 weeks.
- Pinch off any flower stalks that appear to keep leaves tender.
Treat your scrap like any other leafy green, and it will reward you with fresh harvests.
Harvesting Beet Greens
You can start harvesting leaves once they are 4 to 5 inches tall. Use scissors to snip the outer leaves, leaving the center to keep growing. This is the cut and come again method, and it allows you to harvest the same plant multiple times. New leaves grow in within days.
Beet greens taste best when picked young and tender. They are slightly earthy and similar to spinach or chard.
Best Ways to Use Beet Greens
Homegrown beet greens are versatile in the kitchen. Try them in:
- Fresh salads with dressing and cheese.
- Sauteed dishes with garlic and olive oil.
- Smoothies for a nutrient boost.
- Soups and stews for added color and flavor.
- Stir fries with onions and noodles.
Use the stems too. They taste great when chopped and lightly cooked.
Common Problems and Solutions
- Slimy water: Change it more often and clean the dish.
- No new growth: The scrap may be too old. Try a fresher beet.
- Yellow leaves: Often a sign the scrap needs nutrients. Move it to soil.
- Wilting: Add water and move to a brighter, cooler spot.
Tips for Continuous Harvests
- Start a few beet scraps at different times for staggered harvests.
- Harvest outer leaves first to keep new ones coming.
- Use organic beets for better growth and cleaner greens.
- Combine scraps in one larger pot for a fuller plant display.
Why Try This Project
Regrowing beets from scraps is a fun way to reduce kitchen waste while creating fresh food at home. It is a perfect activity for kids, beginner gardeners, or anyone who wants to enjoy living plants without buying anything new. The whole process is forgiving, low effort, and surprisingly productive for such a small project.
Final Thoughts
Planting beets from scraps is one of the easiest gardening tricks you can learn. With just a single beet top, a dish of water, and a sunny window, you can grow fresh, leafy greens to enjoy for weeks. It is a small project that brings big satisfaction, especially when you realize how much food you can grow from kitchen leftovers.
Save your next beet top, follow these steps, and discover how rewarding it is to grow your own greens from scratch.