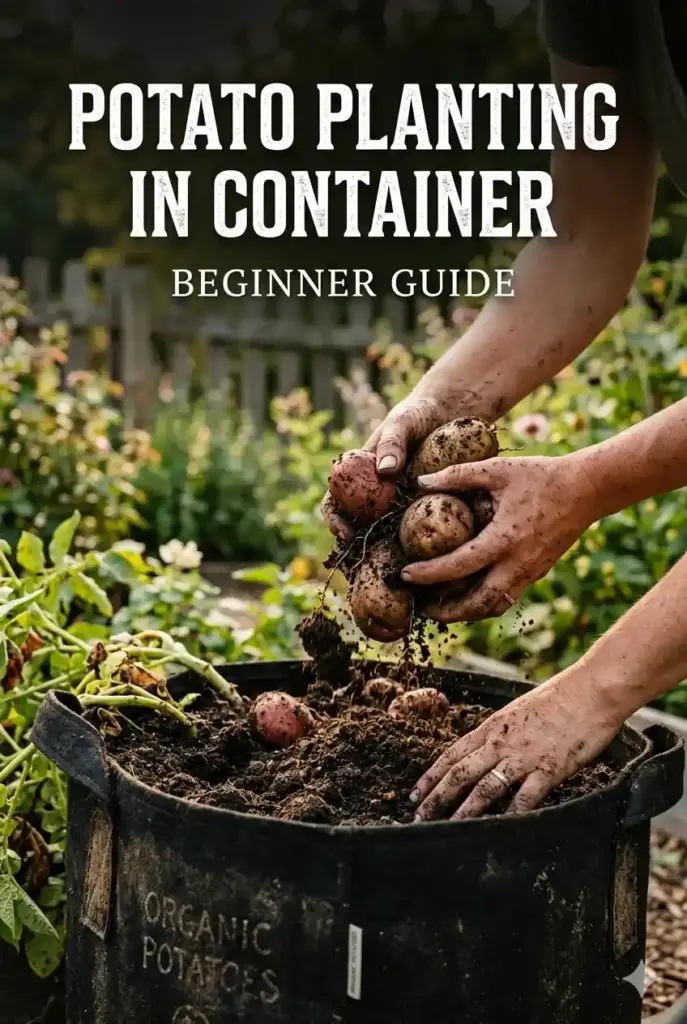
Potatoes are one of the most satisfying vegetables to grow at home. The moment you dump out a container and see dozens of fresh potatoes rolling onto the ground, you realize why so many gardeners love this crop. The best part is that you do not need a big backyard. You can grow a full harvest of potatoes right on your balcony or patio using just a container.
This beginner guide walks you through everything you need to know to plant potatoes in containers, from seed potatoes to harvest.
Why Grow Potatoes in Containers
Container potatoes have a lot of advantages, especially for beginners:
- You can grow them in small spaces like balconies or patios.
- Containers warm up early, giving you a head start in spring.
- Harvesting is easy. Just tip the container over.
- Fewer pests and diseases compared to ground planting.
If your garden soil is rocky, heavy clay, or already taken up by other crops, containers are a perfect solution.
Choose the Right Container
Potatoes need depth more than width. Pick a container that is at least 16 inches deep and holds 10 gallons or more. Options include:
- Fabric grow bags: Affordable, reusable, and breathable.
- Plastic buckets: Drill drainage holes in the bottom.
- Large pots: Any tall planter with drainage works well.
- Stacking potato towers: Designed specifically for potatoes.
Whatever you choose, drainage is critical. Potatoes rot quickly in soggy soil.
Pick the Right Potato Variety
Not every potato is a good container candidate. For best results, go with early or mid-season varieties that do not need months to mature:
- Yukon Gold: Buttery flavor and reliable producer.
- Red Norland: Quick growing with smooth red skin.
- Fingerling: Small, flavorful potatoes that fit well in pots.
- Charlotte: A popular salad potato with firm flesh.
Always buy certified seed potatoes from a nursery or garden center. Store-bought potatoes are often treated to prevent sprouting.
Prepare the Seed Potatoes
About 2 weeks before planting, place your seed potatoes in a bright, cool spot. Small green sprouts called chits will grow from the eyes. This step, called chitting, gives you a faster, stronger start. If your seed potatoes are large, cut them into pieces with 2 eyes each and let them dry for a day so the cuts heal.
The Right Soil Mix
Potatoes love loose, rich, well-drained soil. Mix a high quality potting mix with compost in a 50/50 ratio. Avoid heavy garden soil, which compacts too much in containers. You can also add a handful of slow release organic fertilizer to give your plants steady nutrition.
How to Plant Potatoes in Containers
Planting is simple. Here is the step by step:
- Fill the container with 4 to 6 inches of soil mix.
- Place 2 to 3 seed potatoes on top, with sprouts facing up.
- Cover them with another 4 inches of soil.
- Water gently until the soil is evenly moist.
Do not fill the container all the way at first. You will add more soil over time as the plants grow.
Hilling Your Potatoes
As the plants grow, cover the stems with more soil or compost. This is called hilling. Each time the plants reach about 6 inches tall, add enough soil to cover the lower half. Potatoes form along the buried stems, so the more you hill, the bigger your harvest. Keep hilling until the container is almost full.
Watering and Sunlight
Potatoes need consistent moisture to grow fat, round tubers. Water when the top inch of soil feels dry. Containers dry out faster than ground beds, so check daily during hot weather. Place your container in full sun, ideally 6 to 8 hours of direct light.
Feeding Your Plants
Feed your container potatoes every 2 to 3 weeks with a balanced fertilizer or diluted compost tea. Once the plants start to flower, switch to a formula with more potassium to encourage tuber formation. Avoid too much nitrogen, which produces lots of leaves but fewer potatoes.
Common Problems and Solutions
- Yellow leaves: Usually natural at the end of the season. Check for pests if early.
- No tubers: Often from not hilling or planting too deep from the start.
- Scabs or cracks: Usually from inconsistent watering.
- Soft, rotting tubers: Means the soil stayed too wet.
When to Harvest
You can harvest new potatoes about 60 to 70 days after planting, or wait until the foliage yellows and dies back for full-sized potatoes. Simply tip the container onto a tarp and sift through the soil. It feels like a treasure hunt. Let the potatoes dry in a shady spot for a few hours before storing.
Storing Your Potatoes
Store potatoes in a cool, dark, well-ventilated place. Do not wash them until ready to cook, since moisture speeds up spoilage. Properly stored, they can last 2 to 3 months. Use any damaged potatoes first.
Final Thoughts
Growing potatoes in containers is one of the easiest and most rewarding projects for beginner gardeners. With the right container, soil, and a little patience, you can enjoy a fresh, flavorful harvest without needing a big garden. Plant a few seed potatoes this season, and you will see just how fun and productive container gardening can be.